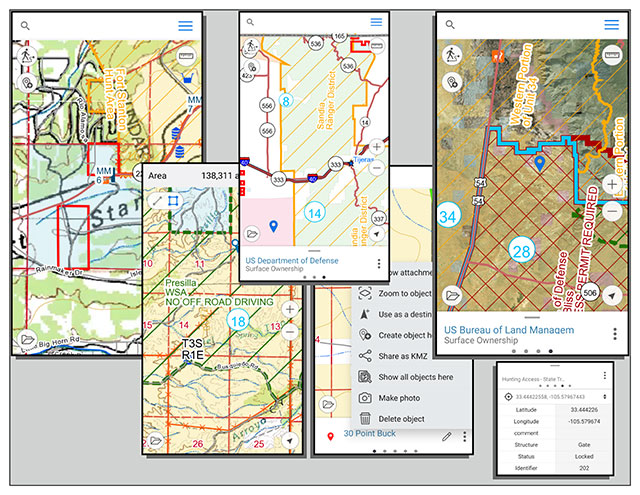
New Mexico Hunting/Recreation Maps
January 24, 2024 update:
The .cmf2 map files produced by BLM for use in CarryMap are no longer being updated due to changes in BLM's Information Technology and New Mexico Department of Game and Fish personnel. The final map available has no expiration date, so data included in it will remain as seen.
Other projects to provide offline mapping data from the BLM to users around the country are in development and will be announced here when available, with the final maps being removed from CarryMap at that point. The developers of CarryMap have been great partners during our nine year run of the BLM New Mexico Hunting and Recreation Maps program.
For more information on national efforts and for future program access visit:
Mobile GIS | Bureau of Land Management (blm.gov)
BLM-New Mexico has partnered with the New Mexico Department of Game and Fish (NMDGF) to offer free maps of Big Game hunting units and recreational opportunities on public land using the CarryMap application. Map files expire one year after publishing.

Please click or tap on the below sections to read how to install and use these free maps.
- Disclaimer (Click/Tap to Expand)
-
By using the BLM/NMDGF Hunting/Recreation Maps, you agree to these conditions:
No warranty is made by the Bureau of Land Management as to the accuracy, reliability, or completeness of this data for individual use or aggregate use with other data, or for purposes not intended by BLM. Spatial information may not meet National Map Accuracy Standards. This information may be updated without notification.
The Bureau of Land Management strives for reliable and complete data. Due to the inherent variability in GPS and survey data precision, along with the variety of other agency data sources, this data is of varying accuracies.
Access points on State Trust Lands have not been verified by the New Mexico State Land Office. Verification of the locations and access will be coordinated through the New Mexico State Land Office and the New Mexico Department of Game & Fish.
- Map Program Information
-
Spring 2021-2022 Hunting/Recreation Maps
The BLM Hunting/Recreation Maps program supports amazing features in CarryMap. What does this mean for you, the end user? Fast display of maps, a full mobile data collection feature (you can create datasets and collect point, lines/tracks, and polygons), you can add aerial/satellite imagery if you have a data signal, you can use other online services, and even Google Drive and Dropbox support!
CarryMap is an evolving product, with the developers putting out several updates a year. We strive to work with them to add features and fix issues that may arise.
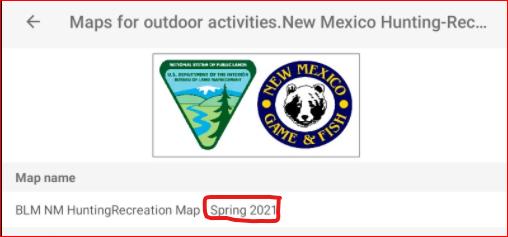
This year, we are going to attempt to update the map quarterly, to ensure you have the most up to date data on your device. Maps will now expire one year after publishing. We will no longer be naming the files for the year, so you can tap the “Refresh Map” button to download the latest version (map file icon has a refresh/recycle symbol). To see which map you are currently using, open it, tap the menu button at the top right, tap the 3 dot menu button next to the map and then About Map. The map name will have something like “Spring 2021” in the map name to let you know what quarter it was published.
Please read the below sections and ensure you are using the most up to date version of CarryMap. The below sections apply to CarryMap 5.5.X.
You will need to download the CarryMap App
 (Light Blue Icon). Please see the Download Information and Instructions tab below.
 - Download Information and Instructions
-
1. Download the FREE app – You MUST follow step 2 to download map file afterwards
Android 4.1 or later (Google Pixels, HTC, Samsung, OnePlus, Moto, LG, etc.)
https://play.google.com/store/apps/details?id=com.dataeast.carrymap&hl=eniOS/iPadOS 9.0 or later - Apple (iPhones, iPads)
https://itunes.apple.com/us/app/carrymap/id1105790610?mt=8Windows 8, and 10 - Uses the same files as the mobile apps!
https://carrymap.com/en/support/carrymap-for-windows/2. Download the FREE Map (or Maps) on Android or iOS.
- Open the app by tapping on it after it finishes installing.
- Tap OK at the notification page after reading it.
- If prompted, allow GPS/Location and storage access Permissions to show position and download files.
- Tap on Gallery at the bottom.
- Tap on the search icon at the top.
- Type in the words – New Mexico to filter the list of maps.
- Tap on New Mexico Hunting Recreation Map to begin download (≈ 150MB). Red Circled icon will show if there’s an update to your existing map.
- A thin blue circle around an X will show your download, wait for the file to finish downloading (do not press the X, this cancels the download).
- Once the file downloads, it opens automatically.
- Download the OPTIONAL Topo map package (≈ 610MB) if you wish using the same steps.
- That’s IT!
2B. Download the FREE Map (or Maps) on PC.
Maps for the PC version must be downloaded from the CarryMap Gallery website. Links to the maps/pages are below.
- Full State Map – (≈ 150MB) – Expires 1 Year after Export (Exported 27 May 2021)
- 1:100K Topo Package (Optional) – (≈ 610MB) – Doesn’t Expire
Updated 16 May 2018 - Smaller file size, new format, fixed missing topos.
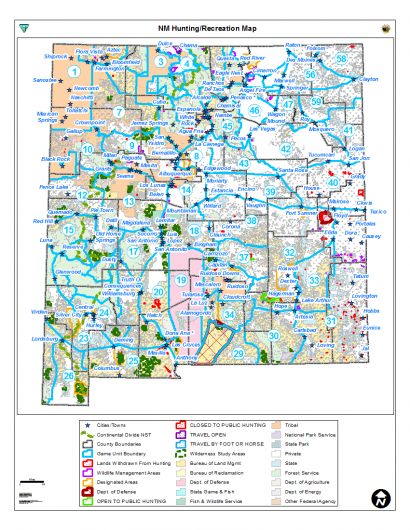
Click the Sample Map below to enlarge (Data from April 2018)
New Mexico Hunting and Recreation Map Index - Frequently Asked Questions/Changelog
-
Known Issues
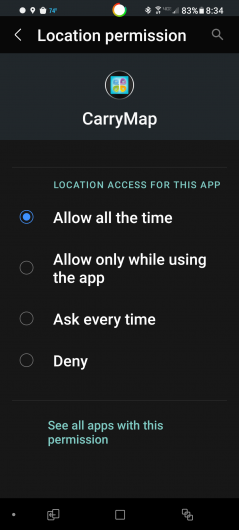
Android 11 has introduced a new permissions setting that allows you to pick between situations when to use specific permissions. It is important to note that when you first run CarryMap on an Android 11 device to select “Allow all the time”. This allows the app to continue to collect GPS data when the screen is turned off while the app is running. If you have closed the app/map, it does not use your position data.
Allow all the time = While the app is running/collecting data, even if not in the foreground or the screen is off/locked, it will process GPS positions.
Allow only while using the app = Collects only while the screen is unlocked and on and the app is being viewed.
Ask every time = Asks you for GPS permissions every time you open the app.
Deny = GPS permissions not allowed, will not show your position on the map or allow you to collect data via GPS position.
Say you are collecting a line/track to see how far you hiked for the day, and you put your phone in your pocket. You bring your phone back out and the GPS stopped collecting data because the screen turned off and you lost all of that information, or it shows up incorrectly. This prevents that sort of situation from happening while the app is running.Frequent Asked Questions
When I try to download the map, nothing happens, I just get an X.
- Download indicator is a light blue and very thin line that circles the X, many users cannot see their file downloading until it is finished. Pressing the X cancels the download. When the download is finished, you will see a Cloud Icon with a checkmark in it.
I am being prompted for a password when I try to open the maps. What's the password?
- There is no password, this is an error that the map file is incomplete or otherwise corrupt. Delete the file and try downloading it again over a stable Wi-Fi connection or transferring from a PC.
My device won't show me where I am at on the map and I've pressed the Location button.
- Users of devices without a built in GPS sensor will not see their location on the map. This is not a bug as a GPS or other location reporting sensor is needed to show your position.
- If you have a GPS enabled device and have this issue, you most likely did not give the app permissions. Either uninstall and reinstall, while giving GPS permissions, or long press on the app icon, press app info, permissions, and toggle Location permission.
Why/When do my map files expire?
- Map files expire 1 year after publishing and should be updated, or the old ones deleted and new one downloaded. This is done to ensure you have up to date surface ownership, game unit boundaries, access point and unitization agreement data. It also ensures you get the latest features and datasets we add, and updates from our data partners on a more frequent basis as situations/status on the ground change.
How do I know what version/date of the map I have downloaded?
- To see which map you are currently using, open it, tap the menu button at the top right, tap the 3 dot menu button next to the map and then About Map. The map name will have something like “Spring 2021” in the map name to let you know what quarter it was published.
Spring 2021 Changelog - Updated 27 May 2021
1. BLM Data
a. Surface Ownership (SMA)
- Queried to only include New Mexico (no more scattered Texas plots)
- Set fields for Owner type and last edit date
b. Continental Divide National Scenic Trail
- Updated trail dataset to match Forest Service 2019 official routing
- Added labels for field use
- Changed symbology to standard trail and a dark grey color
- Moved to top of Roads group and renamed to Roads and Trails group
c. Fences
- Included Status Field
d. Township/Range/Section (CADNSDI) dataset updated to 2019 version
- Much more accurate than older 2016 version
- Many new areas covered
e. Cities/Towns
- Changed labels to not be as aggressive at larger scales speeding and cleaning up display
- Removed *’s from several city names (how did those get there?)
2. Updated NM Dept of Game and Fish (NMDGF) Datasets
- Hunting Access - State Trust Lands
- Game Unit Boundaries - NOTE: NMDGF realigned this data resulting in significant changes across many game units.
- Fishing Access
- Open Gate Properties
- District contacts (Turned off by default, turn on to see contact information for your area of concern)
- Set symbology to 75% transparent when on to not fully obscure data underneath.
3. Roads Dataset
- Worked on minimizing duplicate labels.
- How to Use - Basic Features
-
DataEast, the developers of CarryMap, have been creating short tutorial videos on their Youtube page to walk you through some usage of their app. Please click the CarryMap Video Tutorials link at the top right of our webpage to view these videos.
If you are connected to Wi-Fi or cellular signal and want to view Aerial Imagery or other free basemap data follow these steps.
- Tap the Menu button at the top right of the screen.
- Tap Add Basemap.
- Select a Basemap.
- Note, your Base Map will cache/save to your device up to the size you have selected in Menu/Settings/Caching/Set Max Size of Cache to use offline.
If you want coordinates for your location or a point of interest without creating a layer and the ability to share it.
- Tap anywhere on the map.
- Swipe up from the bottom of the map.
- Latitude/Longitude is shown at the top of the screen.
- Tap on the arrows to the right of the coordinates to change format.
- Tap and hold on the coordinates to copy them.
- Paste the information into an email, text message, or other messaging service to send.
If you want to enter coordinates of a point of interest.
- Tap on the search icon at the top left of the screen.
- Enter the latitude and longitude you are interested in marking or paste from another app.
- Tap Return/Done in the keyboard and the screen will zoom to this point.
- If not sure of the format, see the basic feature above. Don't forget the ° symbol.
If you want to measure length or area of something.
- Tap on the ruler icon at the top right of the screen.
- Tap the Line or Polygon symbol that appear after 1 above.
- Tap on the screen at least two times for length, at least three times for area.
- Long tap the measurement at the top to copy the number to share.
- When finished, tap the X at the top right to return to the map.
Want to see a full Legend for the map items or turn layers off?
- Tap on the menu button at the top right.
- Tap on the map name (not the blue check mark).
- Tap on the group or folder of layers you are interested in. For example, BLM Data.
- Tap the drop down arrows on the left side to show the individual symbology per layer.
- If you find a layer you don't want displayed, tap the switch on the right side of it.
- Tap the back arrow at the top left to return to the map.
Want to identify items (features) while looking at the map?
- Tap on an area of interest or your current location.
- All features from active layers where you tapped appear in the identify panel at the bottom.
- Swipe the identify panel from right to left to view other features from active layers.
- Swipe up on a specific layer to get more information (Names of water features, roads, website addresses, ownership type, etc.).
- To close the Identify panel, swipe down at the bottom of the screen.
Searching for something specific?
- At the top left of the screen tap the magnifying glass/search icon.
- Enter your search (hunting unit number, road name, deer, etc.).
- Tap on a result that you are interested in to zoom to it.
- If there is more than one result in the area they will have a purple target icon.
- Review the attribute information by swiping up from the bottom.
- Alternately, you can tap the 3 dots on the right and tap ‘Use as a Destination Point’ to navigate to your selected point.
- How To Use - Advanced Features
-
DataEast, the developers of CarryMap, have been creating short tutorial videos on their Youtube page to walk you through some usage of their app. Please click the CarryMap Video Tutorials link at the top right of our webpage to view these videos.
If you would like to collect a line/track or polygon automatically.
- Tap the Collect Line/Track icon at the upper left (looks like a person walking).
- Tap the icon that shows two points and a line to record line data, or the 4 points and polygon to record polygon data.
- Begin walking with your device and the line/track/polygon will automatically get created behind you as you move.
- Walk the area to be recorded and then tap the now red icon to stop recording.
- Change the feature Name to something you'll remember later by tapping Feature Name and typing on the keyboard.
- You’ll be prompted to Select Layer for Creating Feature. Click on the blue arrow on the right.
- If this is your first time, select "Create New". Name your new layer, or just click OK to accept the default (Track#_Year_Month_Day).
- If you already have a layer to collect to, tap Select from Data to add it from your library.
- Tap CREATE at the bottom again to save your edits.
- Tap on the new feature to see the attributes (information about your line).
If you'd like to collect a line/track or polygon manually.
- Tap the Add Feature icon at the upper left (under the Collect Track/Line icon).
- Tap the Line or Polygon icon that appear to collect a line or polygon.
- Either tap on the screen to digitize a line or use the Coordinates by Location GPS button to create one vertex of your line where you are standing.
- Repeat as needed to finalize line.
- Change the feature Name to something you'll remember later by tapping Feature Name and typing on the keyboard.
- You’ll be prompted to Select Layer for Creating Feature. Click on the blue arrow on the right.
- If this is your first time, select "Create New". Name your new layer, or just click OK to accept the default.
- If you already have a layer to collect to, tap Select from Data to add it from your library.
- Tap CREATE at the bottom again to save your edits.
- Tap on the new feature to see the attributes (information about your line).
If you'd like to collect a point (pushpin).
- Tap the Add Feature icon at the upper left (under the Collect Track icon).
- Tap on the Collect Point icon that appears.
- Tap on the screen where the point is to be recorded or use the Coordinates by Location GPS icon.
- Change the feature Name to something you'll remember later by tapping Feature Name and typing on the keyboard.
- You’ll be prompted to Select Layer for Creating Feature. Click on the blue arrow on the right.
- If this is your first time, select "Create New". Name your new layer, or just click OK to accept the default.
- If you already have a layer to collect to, tap Select from Data to add it from your library.
- Tap CREATE at the bottom again to save your edits.
- Tap on the new feature to see the attributes (information about your line).
To add/attach a photo to your collected feature.
- Tap the feature to select it.
- Tap the Take Photo/Video icon at the bottom.
- Give CarryMap Permissions to take or access your photos or camera if prompted.
- Select photo or video mode on your device.
- Take your photo or video and tap OK or the Check mark.
- To view the photo/video, tap your feature and look at the identify bar. Tap the media to view.
If you want to be able to interact/add other data or map, follow these steps.
- Tap on the menu button at the top right.
- Tap the + button at the top right, and tap on your data.
- On Android, if your data isn’t showing in the Data tab, tap the + button at the bottom right and scroll to the folder that you saved the file to (default on Android is the Downloads folder).
- Tap on the desired file and your data will be moved to the Data tab in step 3.
- Tap on your data and it will be copied to the CarryMap folder and added to your map.
- You'll see your map is now saved as a project.
- To rename your project, tap the menu button and the project name.
If you want to add web services from another source (ESRI, USGS National Map, corporate data)
- Tap the menu button at the top right.
- Tap Select Basemap (if one is already selected tap Change Basemap).
- Tap the + at the top right.
- Tap Services.
- Tap the + at the bottom right.
- Enter the name of the service and the URL for the service.
- Tap the check mark icon.
- Data or Wi-Fi required to use services other than cached data.
- CarryMap Help Documents
-
- Help document (.pdf) for Android
http://link.dataeast.com/cmmahelpen
- Help document (.pdf) for Apple/iOS
http://link.dataeast.com/cmmihelpen
- Help pages for CarryMap for Windows
https://carrymap.com/en/support/help/
http://link.dataeast.com/cmdcchmen/
- Help document (.pdf) for Android
- Contact Information
-
If you have looked through our FAQ/Help documents and need help with these digital maps for the CarryMap application only, contact
Jeremy Zimmerman, GIS Specialist
505-761-8749
jlzimmer@blm.gov


